Pokémon Mystery Dungeon: Red Rescue Team and Blue Rescue Team/Debug Room
This is a sub-page of Pokémon Mystery Dungeon: Red Rescue Team and Blue Rescue Team.

This debug room can be accessed via the respective cheat codes:
| Version | Red Rescue Team (GameShark) | Blue Rescue Team (Action Replay) |
|---|---|---|
| Japanese | 32000AB4 0000 | |
| American | 820C0AB4 0000 | 0210FAF0 00000000 |
| European | 820C0AB4 0000 | 2210E66C 00000000 |
In this area, there are many Pokémon NPCs, through which it is possible to test various game functions. Notably, the area's tileset is not only wholly unique to it, but drawn in a completely different artstyle from the rest of the game! The bright pastel colors and cartoony flat shading definitely brings to mind the likes of EarthBound and Mother 3, the latter of which released only a couple months after this game. The cloud shadows moving on the map and the background music are the same as the ones used for the Pokémon Square; this, along with the somewhat similar design and complete lack of warp points despite the presence of several houses and roads, seems to indicate that this was an extremely early version of the Pokémon Square that was repurposed into a debug room at some point in development.

Below are described the functions of the present NPCs, approximately from left to right and from top to bottom:
Two Mailboxes
![]()
![]()
Function like the Team Base mailbox and the Mission Board.
Three Pelipper
The first two function like the two Pelipper in the Pelipper Post Office. The third does not display any dialog box and will freeze the game after being talked to 10 times.
Azumarill
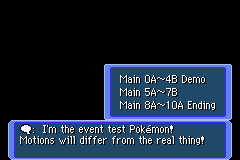
This NPC allows the player to jump to specific story phases, from which the game will continue normally.
Main 0A~4B Demo
Main 0A~1B Demo
- Demo 01: Game stuck on Health and Safety Screen
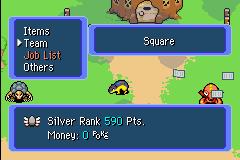 The area is labeled as "Square" in the overworld menu..
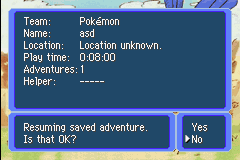 ..but loading the game after selecting Demo 02 or Demo 03 will label it "Location unknown."..
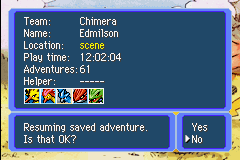 ..and under some circumstances it will result into a yellow "scene" label instead. It is currently unknown why this difference occurs in the main menu.
 - Demo 02: Logo screen, skips intro cutscene and title screen.
- Demo 03: Intro cutscene and title screen, can't be skipped.
- Demo 0A-1: Nature Test.
- Demo 1A-1: Meeting your partner.
- Demo 1A-2: First mission retry.
- Demo 1A-3: First mission complete.


Main 2A
- Main 2A-1: Day begin.
- Main 2A-2: Found your partner sleeping.
- Main 2A-3: Thunderwave Cave mission intro.
- Main 2A-4: No event day begin.
- Main 2A-5: Thunderwave Cave mission retry.
- Main 2A-6: Thunderwave Cave mission complete.
Main 2B
- Main 2B-1: First dream cutscene.
- Main 2B-2: First visit to Pokémon Square.
- Main 2B-3: First visit to Pelipper Post Office.
- Main 2B-4: Second Dream cutscene.
- Main 2B-5: Mt. Steel mission intro.
- Main 2B-6: No event day begin.
- Main 2B-7: Mt. Steel mission retry.
- Main 2B-8: Mt. Steel mission boss defeated.
Main 3A-0~
- Main 3A-0: Day begin before third dream cutscene.
- Main 3A-1: Third dream cutscene.
- Main 3A-2: Greeted by partner to discuss about your dream.
- Main 3A-3: Day begin.
- Main 3A-4: Day begin.
- Main 3A-5: Team Meanies cutscene.
- Main 3A-6: Day begin.
- Main 3A-7: Caterpie cutscene.
Main 3A-8~
- Main 3A-8: Sinister Woods mission intro.
- Main 3A-9: No event day begin.
- Main 3A-10: Sinister Woods mission retry.
- Main 3A-11: Sinister Woods mission boss defeat.
Main 4A
- Main 4A-0: Day begin two times.
- Main 4A-1: Day begin.
- Main 4A-2: Jumpluff cutscene.
- Main 4A-3: Silent Chasm mission intro.
- Main 4A-4: No event day begin.
- Main 4A-5: Silent Chasm mission start.
- Main 4A-6: Silent Chasm mission complete.
Main 4B
- Main 4B-0: Day begin two times.
- Main 4B-1: Day begin.
- Main 4B-2: Greeted by partner to go to Mt. Thunder.
- Main 4B-3: Mt. Thunder mission intro.
- Main 4B-4: No event day begin.
- Main 4B-5: Mt. Thunder mission retry.
- Main 4B-6: Mt. Thunder Peak mission retry.
- Main 4B-7: Mt. Thunder Peak boss defeat.
Main 5A~7B
Main 5A
- Main 5A-0: Day begin two times.
- Main 5A-1: Day begin.
- Main 5A-2: Greeted by partner to go to Great Canyon.
- Main 5A-3: Great Canyon mission intro.
- Main 5A-4: No event day begin.
- Main 5A-5: Great Canyon mission retry.
- Main 5A-6: Great Canyon mission complete.
Main 5B
- Main 5B-0: Day begin two times.
- Main 5B-1: Day begin.
- Main 5B-2: Greeted by partner.
- Main 5B-3: Game stuck on a black screen.
- Main 5B-4: Game stuck on a view of Wishcash's pound.
- Main 5B-5: Discussion with partner about Wishcash's story.
Main 6A
- Main 6A-1: Fourth dream cutscene.
- Main 6A-2: Greeted by partner to go to Pokémon Square.
- Main 6A-2: Pokémon Square cutscene.
Main 7A
- Main 7A-1: Greeted by partner to start running away.
- Main 7A-2: Game stuck on a black screen.
- Main 7A-3: Lapis Cave intro.
- Main 7A-4: Lapis Cave retry.
- Main 7A-5: Lapis Cave complete.
Main 7B
- Main 7B-1: Mt. Blaze or Rock Path.
- Main 7B-2: Game stuck on a black screen.
- Main 7B-3: Mt. Blaze or Rock Path retry.
- Main 7B-4: Mt. Blaze Peak retry.
- Main 7B-5: Mt. Blaze Peak boss defeat.
Main 8A~10A Ending
Main 8A
- Main 8A-1: Spotting Absol.
- Main 8A-2: Frosty Forest or Snow Path.
- Main 8A-3: Frosty Forest or Snow Path retry.
- Main 8A-4: Frosty Grotto retry.
- Main 8A-5: Frosty Grotto boss defeat.
Main 8B
- Main 8B-1: Walking on the icy mountain path.
- Main 8B-2: Mt. Freeze or Snow Path.
- Main 8B-3: Mt. Freeze or Snow Path retry.
- Main 8B-4: Mt. Freeze summit cutscene (game freeze when the light appears).
- Main 8B-5: Mt. Freeze Peak retry.
- Main 8B-6: Mt. Freeze summit cutscene.
Main 9A-1~
- Main 9A-1: Return to Pokémon Square cutscene.
- Main 9A-2: Greeted by partner.
- Main 9A-3: Fifth dream cutscene.
- Main 9A-4: Greeted by partner.
- Main 9A-5: Day beginning with an earthquake.
- Main 9A-6: Greeted by partner to go to Pokémon Square.
- Main 9A-7: Day begin with an earthquake.
- Main 9A-8: Pokémon Square cutscene.
Main 9A-9~
- Main 9A-9: Sixth dream cutscene.
- Main 9A-10: Greeted by partner to go saving Alakazam's team.
- Main 9A-11: Magma Cavern mission intro.
- Main 9A-12: No event day begin.
- Main 9A-13: Magma Cavern mission retry.
- Main 9A-14: Magma Cavern Pit retry.
- Main 9A-15: Magma Cavern Pit boss defeat.
Main 10A
- Main 10A-1: Return to Pokémon Square cutscene.
- Main 10A-2: Seventh dream cutscene.
- Main 10A-3: Greeted by partner to go to the sky.
- Main 10A-4: Going to the sky cutscene.
- Main 10A-5: No event day begin.
- Main 10A-6: Sky Tower Mission intro.
- Main 10A-7: Sky Tower Summit retry.
- Main 10A-8: Sky Tower Summit boss defeat.
Ending
- Main ExD: Ending cutscene.
- Main2 1A-1: Day begin.
- Main2 1A-2: Greeted by Caterpie to go to Luminous Cave.
- Main2 1A-3: Partner's proposal to change team leader.
- Main2 2A-1: Day begin.
- Main2 ExD: Day begin.
Wartortle
This NPC functions like the one above with side story phases.

Sub 0~4
Sub 0
- Sub0 1A-1: No event day begin.
- Sub0 1A-2: Day end.
- Sub0 1A-3: No event day begin.
Sub 1
- Sub1 1A-1: Game stuck on a black screen.
- Sub1 1A-2: Wynaut mission intro.
- Sub1 1A-3: Wynaut mission complete.
- Sub1 1B-1: Base rebuild continue.
- Sub1 1C-1: Base rebuild complete.
- Sub1 2A-1: Smeargle mission intro.
- Sub1 2A-2: Smeargle mission complete.
Sub 2
- Sub2 1A-1: Game stuck on a black screen.
- Sub2 1A-2: Game stuck on a black screen.
- Sub2 1A-3: Game stuck on a black screen.
- Sub2 1A-4: Saving the game, no event day begin.
- Sub2 2A-1: Game stuck on a black screen.
- Sub2 2A-2: Vortex Stone creation.
- Sub2 2A-3: Saving the game, no event day begin.
Sub 3
- Sub3 1A-1: Xatu visit.
- Sub3 1A-2: Saving the game, no event day begin.
Sub 4
- Sub4 1A-1: Spinda awakening cutscene.
- Sub4 1A-2: Xatu Clearwing cutscene.
- Sub4 1B-1: Fiery Field boss defeat.
- Sub4 1C-1: Lightning Field boss defeat.
- Sub4 1D-1: Northwind Field boss defeat.
- Sub4 1E-1: Saving the game.
- Sub4 1F-1: Game stuck on a black screen.
Sub 5~9
Sub 5
- Sub5 1A-1: Charizard and Blastoise cutscene.
- Sub5 1A-2: Saving the game.
Sub 6
- Sub6 1A-1: Latios cutscene.
- Sub6 1A-2: Northern Range boss defeat.
- Sub6 1B-1: Latios awakening cutscene.
- Sub6 1B-2: Pifall Valley mission success.
Sub 7
- Sub7 1A-1: Game stuck on a black screen.
- Sub7 1A-2: Game stuck on a black screen.
- Sub7 1A-3: Saving the game, no event day begin.
Sub 8
- Sub8 1A-1: Game stuck on a black screen.
- Sub8 1A-2: Game stuck on a black screen.
- Sub8 1A-3: Game stuck on a black screen.
- Sub8 1A-4: Game stuck on a black screen.
- Sub8 1A-5: Game stuck on a black screen.
- Sub8 1A-6: Medichan and Ekans cutscene.
- Sub8 1A-7: Saving the game, no event day begin.
- Sub8 1A-8: Saving the game, no event day begin.
Sub 9
- Sub9 1A-1: Game stuck on a black screen.
- Sub9 1A-2: Game stuck on a black screen.
- Sub9 1A-3: Game stuck on a black screen.
- Sub9 1A-4: First Gengar cutscene.
- Sub9 1A-5: Mt. Freeze mission complete.
- Sub9 1B-1: Second Gengar cutscene.
- Sub9 1B-2: Murky Cave mission complete.
- Sub9 1C-1: Game stuck on a black screen.
First Blastoise
Gives a red "Unregistered dialog script" line.
Second Blastoise

Allows triggering four different animations, without playing any sound effects.
- Effect 1: Shows an unused blowing up animation around the player Pokémon.
- Effect 2: Nothing happens.
- Effect 3: Shows an unused animation that appears to be anger steam in red and white pixels, then the game freezes.
- Effect 4: Shows an earthquake animation. This is longer and stronger than those used during story cutscenes.
Golem
Gives a red "Unregistered dialog script" line. However, in the Japanese version, it has actual dialogue:
| Text | Translation |
|---|---|
ゴローニャ「よし。 ???を あげよう。 |
Golem: Alright. I'll give you the ???. |
[Leader's name]は タルを のぞきこんだ! |
[Leader's name] peered into the barrel! |
なんと ばくれつのタネを みつけた! |
You found a Blast Seed! |
ゴローニャ「しばらくしてから またきてよ。 |
Golem: Come back after a while. |
The first three texts are displayed when Golem is talked to the first time, then it will always show the fourth dialogue.
Octillery
A bunch of flyers fall around Octillery in a loop, which is an animation used during the Main 9A-1 cutscene. When talked to, it gives a red "Unregistered dialog script" line. However, in the Japanese version, it instead shows a huge list of 231 elements, entitled "ちじょう" (Ground), subdivided into 24 pages.
| US/Australia | Japan |
|---|---|
 |
 |
It's a list of overworld and cutscene locations. When selecting any of these with either the A or the B button, the list simply closes. The list is a perfect match to the functional Field Map feature in the debug-enabled build, and Octillery likely served as an alternate method to access it at one point. Notably, this Octillery NPC does not function in the debug-enabled build either.
| Page | List | Translation | ||
|---|---|---|---|---|
| ちじょう | Ground | |||
| 1 |
T00P01 |
デバッグひろば |
T00P01 |
Debug Square |
| 2 |
B01P01B |
きち がいかん |
B01P01B |
Base Exterior |
| 3 |
B02P02C |
きち ないぶ |
B02P02C |
Base Interior |
| 4 |
B04P02A |
きち ないぶ |
B04P02A |
Base Interior |
| 5 |
B06P01B |
きち がいかん |
B06P01B |
Base Exterior |
| 6 |
B07P02C |
きち ないぶ |
B07P02C |
Base Interior |
| 7 |
B09P02A |
きち ないぶ |
B09P02A |
Base Interior |
| 8 |
B11P01B |
きち がいかん |
B11P01B |
Base Exterior |
| 9 |
B12P02C |
きち ないぶ |
B12P02C |
Base Interior |
| 10 |
B14P02A |
きち ないぶ |
B14P02A |
Base Interior |
| 11 |
B16P01B |
きち がいかん |
B16P01B |
Base Exterior |
| 12 |
H02P03 |
かいてい どうくつ |
H02P03 |
Seafloor Cave |
| 13 |
H06P05 |
やけのはら |
H06P05 |
Scorched Plains |
| 14 |
H08P01 |
ジャブジャブがわ |
H08P01 |
Rub-a-Dub River |
| 15 |
H13P04 |
がんせき どうくつ |
H13P04 |
Boulder Cave |
| 16 |
H22P01 |
こだい いせき |
H22P01 |
Ancient Relic |
| 17 |
H29P03 |
とざされた しま |
H29P03 |
Enclosed Island |
| 18 |
A03P03 |
ゆきやまのなか |
A03P03 |
In the Snowy Mountains |
| 19 |
D02P01 |
でんじはのどうくつ いりぐち |
D02P01 |
Thunderwave Cave Entrance |
| 20 |
D06P03 |
ライメイのやま ちょうじょう |
D06P03 |
Mt. Thunder Summit |
| 21 |
D10P03 |
じゅひょうの もり おくち |
D10P03 |
Frosty Forest Rear Area |
| 22 |
D13P03 |
てんくうの とう さいじょうかい |
D13P03 |
Sky Tower Summit |
| 23 |
D23P01 |
ねがいの どうくつ おくち |
D23P01 |
Wish Cave Rear Area |
| 24 |
S06 |
せかいちず |
S06 |
World Map[9] |
Notes:
- ↑ Using the Field Map feature in the debug-enabled build, this leads to the unused Provisional Map.
- ↑ Using the Field Map feature in the debug-enabled build, this leads to Luminous Cave, which is named "ひかりの どうくつ" in Japanese.
- ↑ Oddly, this is the name of the dungeon where Groudon is found. Through the Field Map, this instead leads to Volcanic Pit, Groudon's Friend Area.
- ↑ Duplicate Friend Area name from H06P05. Through the Field Map, this leads to the cutscene area seen before finding Lapis Cave's entrance.
- ↑ Spelled "おおきいなる きょうこく" in the final game.
- ↑ Uses an incorrect duplicate as its name. through the Field Map, this instead leads to Silver Trench's boss floor.
- ↑ Misspelled, using り (ri) instead of る (ru).
- ↑ The う (u) is replaced with お (o) in the final game.
- ↑ Refers to the map that can be found inside the upgraded Team Base.
Jirachi
Functions like Luminous Cave. During the dialogue, the playing music will be replaced by the Luminous Cave theme.
Others
All of the other NPCs will function normally as the ones in Pokémon Square.